

Tutorial by Linda Fields
Zentangle – the therapeutic art of drawing repeating patterns, or tangles. Rick Roberts and Maria Thomas, founders of Zentangle.com, created this amazing art form and key to a fulfilling life.

Auras, Strings, & Dots – Oh My!
Throw away the negativity! You don’t need it. There’s no such thing as can’t because if you can draw a line, if you can write the letter S or put a dot on paper, then you my friend can Zentangle! There are no mistakes. Each stroke becomes its own beautiful mark. What will it look like when you’re done? Does it matter? This creative outlet is an amazing tool for healing so enjoy the journey!
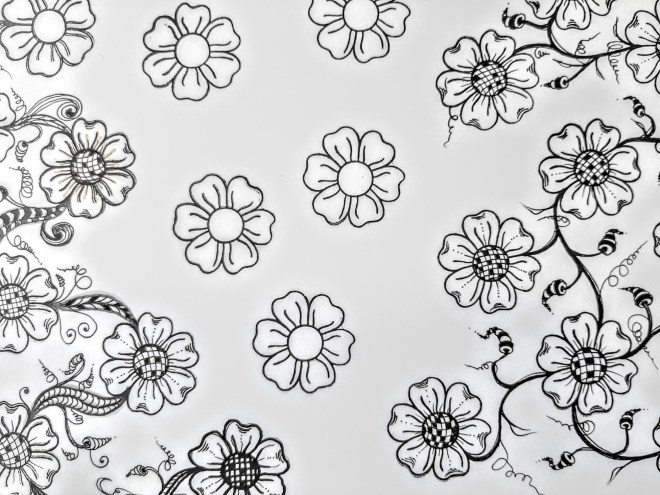
I’m still learning (I’m always a work in progress) so I honestly don’t know all the different marks and their fun names but I played around with a few basics while practicing (see photo above). I began with a fun Altenew stamp and scattered those flowers all over my paper before adding my Auras, Strings and Dots. What’s a Zentangle Aura? Draw a line (also known as a String). Now, draw another one just like it and repeat! For example, the flower stamp has very few details but compared to the lines I added, it takes on a kind of 3D crossword puzzle effect in the middle with accenting details for each petal. I added elongated swirls (the letter “S”) to connect the flowers. I drew more Auras and added squiggles to fill in the white space. I used more ink to shade and create depth using Micron drawing Pens by Sakura.


Materials
- Marker Paper (recommended)
- Waterproof Ink Pad – Black
- Altenew Floral Motifs Stamp Set
- Sakura Micron Drawing Ink Pens
- Altenew Alcohol Ink Pens (2 colors + Black minimum)

Tips ‘n Tricks
Once I was done drawing, I cut my 8.5″x11″ paper down to a 3.25″x8.25″ slimline card front with a white card base measuring at 3.5″x8.5″ and a black mat to nicely frame it all. I inked the card front paper edges using a black ink pen before coloring the flower petals with Altenew’s Alcohol Ink Pens.

Look closely at the photo above. Compare the two flowers. The blue one is finished. The green flower is not done. It only has the first layer of color. Alcohol inks blend beautifully so consider using 2 to 3 colors for depth and added interest. I put my lightest color down first. I didn’t worry about full saturation on the first layer. A key to Zentangle is to take your time! Breathe in through your nose and exhale out through your mouth. Slow and easy, relax and enjoy! Now for your second, darker, contrasting color! Get those creases and places where you want shadow to create depth. Continue this step if you have a third color. Your last layer will be the color you started with, covering that section to blend your colors. Watch the magic as it happens!


That Finishing Touch
Besides adding a black mat, I filled in the remaining white space with the sentiment “SMILE” from the same Altenew stamp set. I didn’t want the focus taken away from the gemstone colored flowers so I put the repeating word into the backdrop itself. This whimsical card was so fun to make. Give yourself a moment to relax! Zentangle your way to a happier you in your sacred space today!


Discover more from LINDA'S STUDIO
Subscribe to get the latest posts sent to your email.
Love this…great blog and project
I’m so glad you love my blog and my latest project! Welcome and enjoy all the fun yet to come! Hugs! 🙂
I totally agree with you that you should enjoy the journey. Zentangle is a great way to relax. I love the final result of your drawing!
Thank you so much Sandra! I must say I am addicted to Zentangle. I can’t wait to become a certified Zentangle teacher. Hopefully, by this time next year, it will be a reality! Very exciting! Love n hugs to you!
You completely changed the look of that stamp! This is such great class!!